
Anyways....on with the show....
Here's my beautiful, lovely chair. I think I'll call her Chairyl (funny?... no? ....whatever...) She needs a name because she now means much more to me than just an ordinary chair, after all of the backbreaking work that went into it!

Here's some before pictures....it's really scary. Don't say you weren't warned.

The back

A close up of the seat....I know, this is horribly disgusting....I can't believe I am putting this on the internet. We have had this chair for many many years. The black hand prints were the last straw. My son took it up to his bedroom to change a lightbulb and left it up there for a day....during which, my then three year old daughter found some black craft paint I had left out (dumb dumb dumb Anna) and decided to make hand prints all over this and my son's couch cushions. I cried. So, this chair was put out to pasture until I decided to fix it up!


I started by sanding down all of the wood. Then I pretty much started yanking and prying until I figured out how this back piece of fabric was held on (I had no clue). Once I got it to rip away a little, I started pulling out staples. Each piece of furniture you re-upholster will basically tell you how to re-do it once you get in and see how it's assembled. (I will pause for a moment so you can laugh at my purple pants)..........................ready? Let's go!

You can see how I just yanked the fabric and the staples came halfway out....and then I just pulled them out with needle nose pliers.

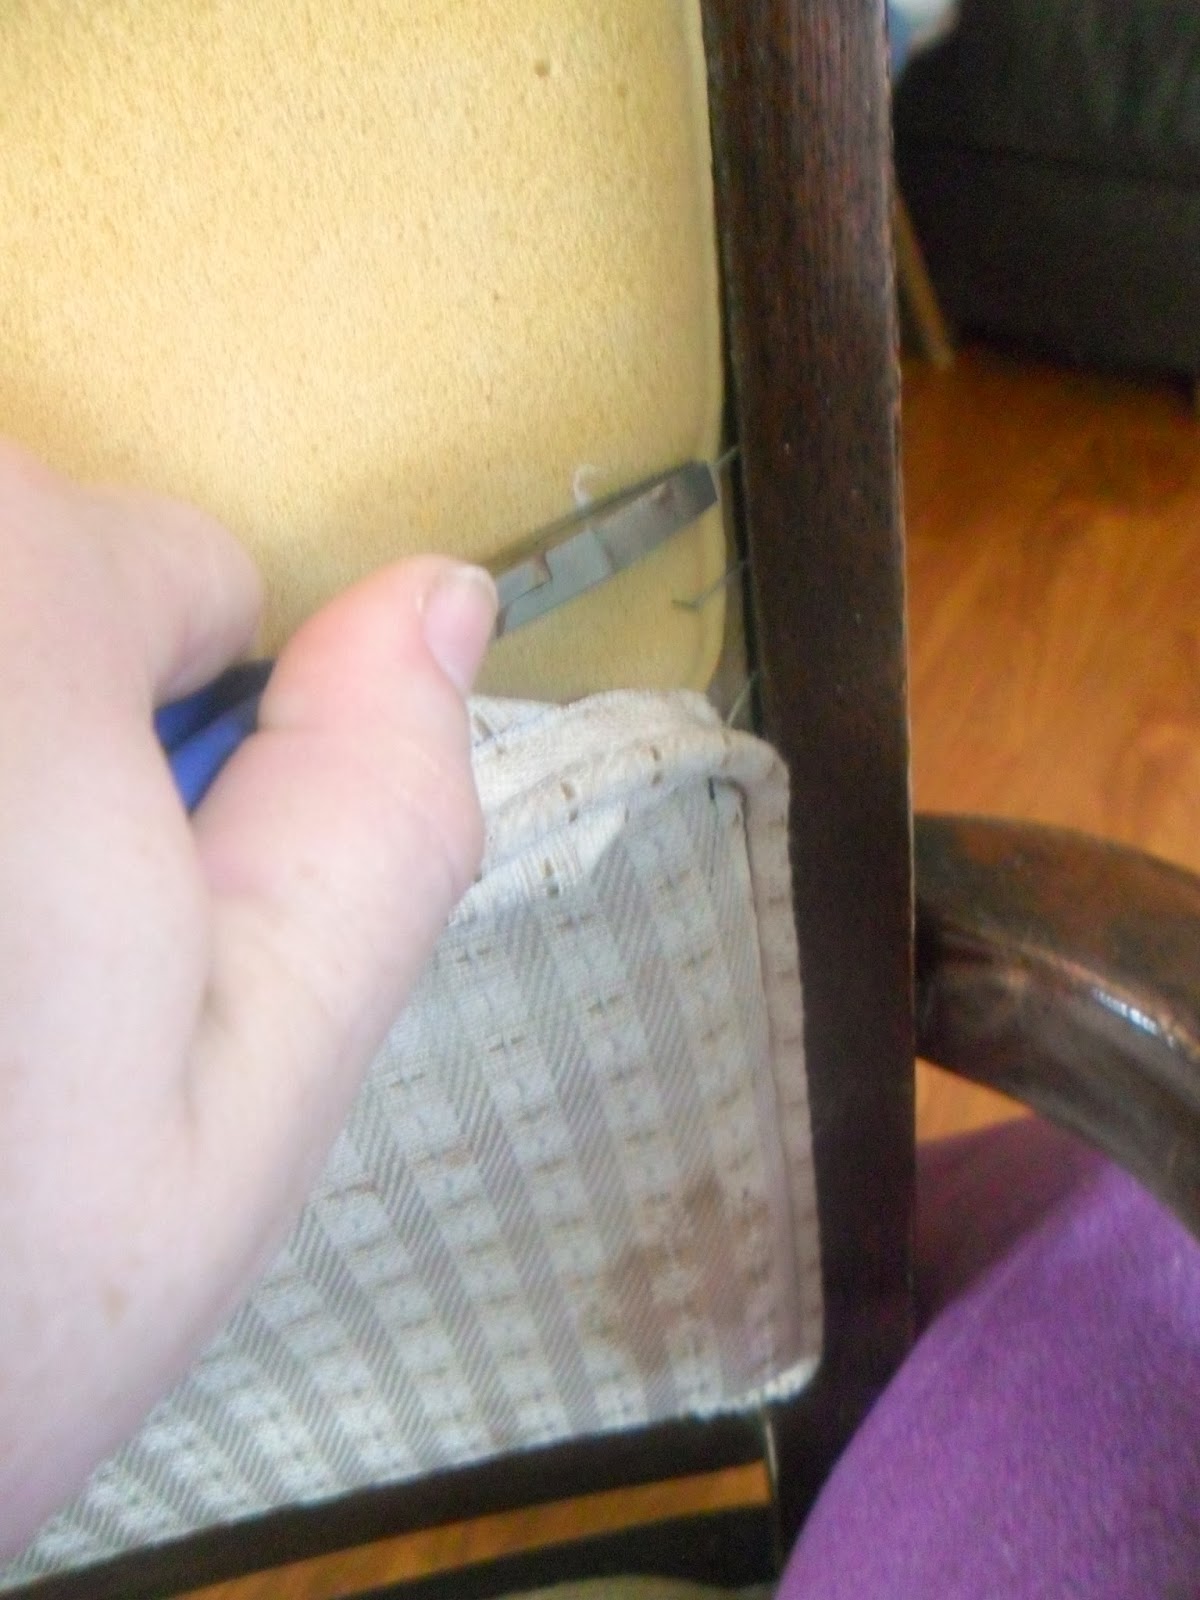
Until I got to only the bottom part left hanging on.

I had to remove the cushion to get to the very bottom staples. It was glued on....so I carefully pulled it off.

Next I just continued removing the fabric and staples until it was free from the chair.

It was a TON of staples. I cut my hand all up too...

Under the cushion was literally the back of the chair's fabric, stapled taut to the inside of the wooden frame. The only thing giving it a little bit of support was an extra layer of muslin stapled in with it. I was surprised it held up so well.

I decided to leave these pieces attached and to cover them with the new fabric. I didn't want to try and re-stretch the fabric across the open chair frame. I figured out another method for attaching the back piece of fabric.

Next I unscrewed the seat base from the frame.


Once I got all of the fabric off, I painted the entire thing with three coats of Valspar Notre Dame....I had a full test pot of it in the garage, so I used it. It was a happy accident. After that I added a coat of Minwax polycrilic for a top coat. I totally forgot to get a picture of me painting, but I'm sure your imaginations are right on point. ;)

The seat base had piping around it. I decided to leave the fabric on the seat base for extra support, and just take off the piping. Do you see how there's two sets of staples. One going around the perimeter and one stapling down the folded fabric? I just took off the one around the perimeter...which was just the piping.

Next I cut out my fabric (this is the back cushion actually...guess I didn't get the picture for the base cushion). I made sure to give myself plenty of excess, that will be trimmed off later. And of course, I lined up the pattern in a way that I liked. This is this fabric from fabric.com and I used about 1 yard for this project.

I started by stretching the fabric taut and stapling on the back of the cushion once in the center of each side.


After I did that, I worked my way from the middle out, alternating sides as I went...so that way it would be very even. I also made sure to check the front side for wrinkles and funky lines often throughout this process.

Once I got to the corners, I just folded them over as you see in the picture and sort of fudged around with it until I got it to look seamless on the front. It took a little playing around to get it right.

After that I went on to the back of the chair. This is my fool proof method. Measure for an approximate fit...and shove the edges under with a butter knife. That's it! I didn't staple or anything....ha! It held really well. If I ever have a problem with it coming out, I'll add a bit of glue under the ledge and re-do it...but for now I think it's just fine.

This was a tricky part. I re-glued the foam back to the muslin fabric backing (like it was before) using some spray adhesive. Next, I shoved the fabric down into all of the cracks. The foam padding fit into that frame exactly, so there was a well defined "crack". That's what I was working with. At first I thought there wouldn't be room to add any sort of trim around this to hide the ugly edge, or even staple it for that matter, and I started sweating it....but as you can see, foam is squishy...

I just shoved the foam down with the stapler and was able to staple into the side of the wood frame.

After that, I used scissors to cut as close to the edge of the staple line as I could and to trim off all of the excess fabric.
Next came the nail head trim. These were the tools I used. Well, not the screwdriver....not sure why that's in this picture. A hammer, needle nose pliers, an exacto knife and silver nail heads.

This was hard at first, I had a very small space to add the nail heads. Like I said before, I had to squish down the foam to make it work. What I did was take the exacto knife and try to trim the excess fabric off....which was unsuccessful. I guess exacto knife was dull....so then I used it to carefully tuck and fold over the excess pieces under each nail head as I went along. I used the needle nose pliers to hold the nail heads in place.

And then I hit it with the hammer until I set the nail head, and then I removed the pliers and tapped it the rest of the way in place. (no, I'm not left handed....I was staging this shot with a camera in my hand, so the hammer went lefty...lol)

You have to be careful that you hit the nail heads strait on...they bend and warp reeeeeally easily. It was SUCH a pain in the butt! There was a lot of starting over.

Another thing I could have prevented, had I taped off my wood before doing this, was the beating my lovely paint job took while I was "tapping" those nail heads in. If you look close you can see all of the scratches. Oh and I totally didn't iron the fabric either....but it straitened out after all of the nails were in (phew). YOU should definitely iron YOUR fabric :)

Slowly coming along......

And finally after three days of "nailing" She's all done!
I went back with a teensy craft brush and re-painted all of those little scratches, and then I went over them with a clear coat again too.


In case you wanted to know what the entry to my kitchen looks like.

sigh.....so much better!

This is actually phase 1 for this little chair. I have plans to add more nail heads to her in a few other places, but I decided to give it a break for a bit. She is passable right now, and that's good enough. My hands need a break!
Hope everybody has a great weekend!
xoxo
Anna
linking up to:
the silly pearl
the chicken chick
Thrifty decor chick
diy showoff
life on lakeshore
drive
titi crafty
uncommon designs
rain on a tin roof
twelveOeight
craft0maniac
the girl creative
under the table and dreaming
coastal charm
a stroll through life
my uncommon slice of suburbia
our home away from home
home coming
live laugh rowe
52 mantles'
36 avenue
diy dreamer
the winthrop chronicles
C.R.A.F.T.
craft-o-maniac
carolyn's homework
not just a housewife
ginger snap crafts
smart school house
clean and scentsible
southern savvy style
diy by design
the thrifty home
happy housie
free pretty things for you
someday crafts
two it yourself
made in a day
polkadots on parade
lady behind the curtain
seven thirty three
vmg206
live laugh rowe
made in a day
living well spending less
artsy fartsy mama
liz marie blog
jennifer rizzo
life in velvet
my repurposed life
from my front porch to yours
just us four
the shabby nest
craft dictator
my love to create
remodelaholic
the idea room
tatertots and jello
too much time on my hands
classy clutter
It's overflowing
one more time events
be different act normal
a little claireification
momnivore's dilemma
nifty thrifty things
flamingo toes
pink when
three mango seeds
between naps on the front porch
skip to my lou
cherished bliss
sugar bee crafts
our delightful home
diy dreamer
kathe with an e
cherished bliss
crafty allie
making the world cuter
east coast creative
sits girls
nanacherrow
yesterfood
kammy's Korner
miss mustard seed
somebody's dinner
Wow, Anna! That's an amazing transformation! Talk about going from trash to treasure! Great job :)
ReplyDelete- Tasha @ Designer Trapped in a Lawyer's Body {www.designertrapped.com}
Thanks Tasha! Yeah, I suppose most people would have thrown that hideous chair away! I'm so in love with it now, though. It was worth the effort.
ReplyDeleteWhat a pretty chair!
ReplyDeleteBeautifully done! You have more patience than I! :)
ReplyDeleteThanks! haha, I'm not sure about the patience part...I went into this project thinking how easy it was going to be and it would only take an hour or so....determination, maybe...but I won't lie...I was giving those nail head trim my G-rated mommy version of every choice word I could think of!
DeleteVery Nice…love it. Would like to invite you to come share it at One More Time Eventshttp://www.onemoretimeevents.com/2014/02/valentine-round-up-and-party.html
ReplyDeleteabsolutely! I will certainly do that. Thank you so much!
DeleteWow, this is gorgeous and such a great tutorial too. Thanks tons for linking to Inspire Me. Hugs, Marty
ReplyDeleteWanted you to know, I love this so much you’re being featured on The DIY’ers today! http://homecomingmn.blogspot.com/2014/02/the-diyers-49.html
ReplyDeleteThank you so much! That made my day today :)
DeleteAnna, what a gorgeous chair makeover - love the color and the fabric. I recently did an upholstered headboard with nail heads so I feel your pain! Glad I spotted you over at the Show Me What Ya Got Party.
ReplyDeleteMarie @ The Interior Frugalista
Thank you so much! what do they say? it takes pain to be beautiful? ....I think that applies to decor as well, haha! well, at least the nail head trim. So glad you came by and checked out my blog. Have a great day!
DeleteWowzers! This is a stunner. I have yet to try reupholstering, but this tutorial was so easy to follow. I think maybe I'll take a stab at it the next time I pass an old ugly chair. You did a fantastic job and I am very impressed. Pinning for future reference!
ReplyDeleteI'd love it if you linked up with us this week at the Link It or Lump it Party! http://www.twoityourself.com/2014/02/link-it-or-lump-it-link-party-27-plus.html
Thank you so much! I will link up for sure :) Good luck with your future upholstering! Send me a link when you've finished something. I'd love to see!
DeleteWow! Beautiful, Anna. What a transformation. I love the tacks!
ReplyDeleteI'm visiting from Whimsy Wednesday Link Party. I would be so honored if you would share this at Brag About It Link Party on VMG206.
http://www.vmg206.com/2014/02/brag-about-it-link-party-no-43-vmg206.html
~ Megin of VMG206
Thank you so much! I sure will. Have a lovely day!
DeleteStopping by from the {wow me} wednesday blog hop. And WOW, loving the chair! I can see alot of love went into it and I would keep it just like that. I think it's perfect!
ReplyDeleteThank you so much! Yes, I really do love it. If I do change anything, it might be to add a little bit more nailhead trim in a couple of places (like the back)...but overall I'm very happy with it!
Deleteit was worth all the pain! it's gorgeous!
ReplyDeleteyes it was! thanks!!!
ReplyDeleteYour chair turned out fabulous! All of your hard work paid off. Love the fabric you chose and the nailhead detail really adds so much to the look.
ReplyDeleteThanks for sharing,
Suzanne
Pieced Pastimes
Thank you so much for sharing your beautiful project on The Inspiration Board at homework. You were featured today!
ReplyDeleteHave a wonderful weekend.
carolyn ~ homework
Thank you Carolyn! Visiting your page now to comment!
DeleteYou did a beautiful job! I am featuring you today on my Saturday Spotlights. Come by and share or grab a featured button. Thanks for linking up yersterday at Craft Frenzy Friday! http://pickledokra.blogspot.com/2014/03/saturday-spotlight-3.html
ReplyDeleteThank you so much Charlie! I really appreciate it!
Deletewhat a beautiful chair makeover! I love the fabric you picked and the nailing really kicks it up a notch and makes it beam! I found you via Remodelaholics.
ReplyDeleteThank you so much! I originally was going to do it in the black and white suzani print....and I actually ordered it, but they sent the wrong fabric, so when I went to get them to fix it, I changed my mind and went with the gray and white....and I'm soooo glad I did!
DeleteAnna it turned out fabulous! Thanx for joining THT this week!
ReplyDeleteThis is awesome! You did a great job redoing the chair! I love the fabric you chose.
ReplyDeleteThank you so much!
DeleteHi Anna,
ReplyDeleteJust wanted to drop in and let you know your beautiful chair is one of my features this week on Link it Or Lump It Link Party! Thanks so much for linking up. Come grab a button and link up again! http://www.twoityourself.com/2014/03/link-it-or-lump-it-link-party-27-plus.html#more
Thank you! That's awesome! I will head on over there right now and leave you a comment.
DeleteThis is a great transformation! I really love the fabric you used and the nail head trim is perfect! I'd love for you to share your great projects at The Makers at TinySidekick.com on Tuesday mornings at 8 eastern! Hope to see you there!
ReplyDeleteCorey @ TInySidekick.com
Thank you so much Corey! I will stop by for sure!
DeleteI have a couple of chairs waiting to be reupholstered. They aren't too complex, but I've got to thank you for this tutorial. It gives me inspiration and hope. Very nice job. I saw it at the It's So Very Cheri link party. Ann Marie @ Iris Abbey
ReplyDeletethank you! what a sweet sweet comment! Good luck with your chairs. I would love to see a picture when they are finished.
DeleteYou did an amazing job. I know how time consuming (and frustrating) reupholstering a chair can be. I will be featuring this tonight at my Winter Blues Wednesday party that opens at 8pm EST. Please stop by and pick up an I've Been Featured button. Thanks.
ReplyDeleteThank you so much! I will stop by for sure! Thanks so much for featuring me!
DeleteOMG Anna! You are amazing! I really wish I have the skill to create something like this..but well, I don't. Such an awesome transformation. :-)
ReplyDeletepshhhh....I'm certain you could do something just like this. :) It just takes patience and then some more patience. Thank you so much for commenting!
DeleteYour daughter's oups moment definitely gave new life to your chair!! LOVE the transformation!!
ReplyDeleteOh dear....then that chair had a whole lot of "life" in it.....Thank you so much!!!
DeleteBeautiful makeover! I love the fabric and the paint! I'm pinning this! Great job!
ReplyDeleteNavy Wifey Peters @ Submarine Sunday Link Party
Thank you so much! That's awesome!
DeleteIt looks amazing Anna!! love those Oops moments which inspires you transform something ordinary into extraordinary
ReplyDeleteThank you so much! Yes, I need to tell myself this the next time there is an Oops moment. Maybe I won't have as big of a fit, lol!
DeleteThis is truly a work of art - what an over the top gorgeous makeover!
ReplyDeleteHAVE to pin this !
Thank you so much!
Deletep.s. your work is too beautiful for your photos not to be watermarked !
ReplyDeletexxx
I know...I have to figure out how to do that!
DeleteWow the amount of hard work that went into it but the results are amazing. So good and im loving the color combination.
ReplyDeleteThank you so much!
DeleteGreat transformation ! Love the fabric and the color !! Good Job !
ReplyDeleteThank you so much!
DeleteThis comment has been removed by the author.
ReplyDeleteThank you for the step-by-step Anna! I have two chairs to redo myself, so this was very helpful to see beforehand.
ReplyDeleteyou are very welcome! Good luck! I'd love to see what you come up with! Be sure to share when you are done! xo
DeleteBeautiful job! That chair looks so elegant now. Thanks for sharing at Fridays Unfolded!
ReplyDeleteAlison
Nancherrow
Thank you so much!
DeleteIt looks beautiful! I just restored one of my chairs and wanted to redo the cushion, like you did. Thanks for inspiring me and for linking up at Treasure Box Tuesday! :-) Dawn @ www.730moments.com
ReplyDeleteThanks! Can't wait to see what you did!
DeleteYou did a great job! Upholstery is such hard work. I have never tried the nail head trip, and I may not now! It sounds like it was quite a process :) I know you're happy with the end result though. Visiting from FFF
ReplyDeleteThanks so much!
DeleteThe chair is a stunner now! Love the nailhead look you added. Thanks for sharing at Trash 2 Treasure Tuesday on Kammy's Korner. Pinning this to the Highlights board! :)
ReplyDeleteThank you so much! That is awesome :)
DeleteYour chair turned out beautiful, what a transformation! And I commend you for adding all those the trim nails!
ReplyDeleteWhat a transformation! Looks so good! Thanks for the inspiration!
ReplyDeleteThank you so much!
DeleteFeaturing your beautiful chair at tonight's Trash 2 Treasure Link Party on Kammy's Korner. :)
ReplyDeletewww.kammyskorner.com
What a change!! Love this chair makeover. Thanks for linking up! :)
ReplyDeleteThank you for sharing with us at Retro Re-Pin, Anna! I chose to feature you during this week's party starting at 8pm tonight. I hope you will stop by with another post!
ReplyDeleteThank you and have a great week~
Robin